Sample Compensation Statements
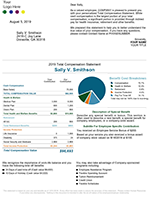
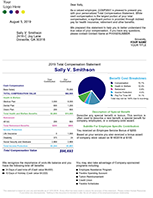
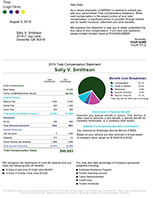
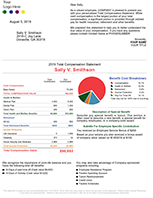
$2 Letter and $3 Legal Flexible Max Statement
This layout gives you control over the lexible headings and messaging. $3 Statement offers the same functionality as the $2 FlexMax, with additional functionality including more space (prints on legal size paper), the option to add text after values, and more lines of customizable text. You can use the same spreadsheet for either option, so you can run a free preview of each to see what works best for you.
To get started creating your statement, download the following spreadsheet to show both Employer and Employee Contributions. save_altSpreadsheet
Download the following spreadsheet to show only Employer Contributions. save_altSpreadsheet
Theme:
Bastillo Letter
Theme:
Bastillo Legal
Theme:
Fella Letter
Theme:
Fella Legal
Theme:
Letta Letter
Theme:
Letta Legal
Theme:
Stella Letter
Theme:
Stella Legal
Helpful Tips
All of our spreadsheets have two worksheet tabs at the bottom for a Standard Data worksheet and a Personalized Data worksheet. On this version, you will use the Standard Data worksheet for entering more than just the date on the statement and disclaimer.
Do not delete any rows from the Standard Data worksheet or any columns from the Personalized Data worksheet.
Special Messaging
On the Standard Data worksheet, in Rows 7 through 15, you can add content about special benefits, stock or service awards, or any other employment feature. If you don't use all of the fields, delete our sample text in column B. The Highlighted Text in row 7 and the Subtitle Text in row 9 are formatted differently than standard text, so you should plan how you use those fields accordingly. If you don't use the Subtitle, it will collapse and allow more text from the Special Contribution Text from rows 10 through 14 to move up. The text that appears after the contribution only appears if you select the $3 version (when you run your previews) which prints on legal size paper.
Bulleted List
You can enter any additional benefits that you offer to show up in the bulleted list at the bottom of the statement in rows 18 through 26 in column B. Delete the ones we have listed as samples or they will show up when you run your statements. These are usually benefits that you don't attribute a specific value to.
Custom Headings
Enter all of the table headings as you want them to appear on the Standard Data worksheet in rows 27 through 69 column B. Column A shows where the column is on our Personalized Data page and tells our statement generator what to match the title in column B with. In rows 71 through 75, you can customize the names of the time off that you offer. You do not need to delete the ones that you are not using in column B. If there is no data in the corresponding column on the Personalized Data page, those fields will not show up on the statement.
In row 72 and row 76, you can control how you want paid time off displayed (enter Hours or Days). This version allows you to show Holidays as a number of Days off and display other time off in Hours if needed.